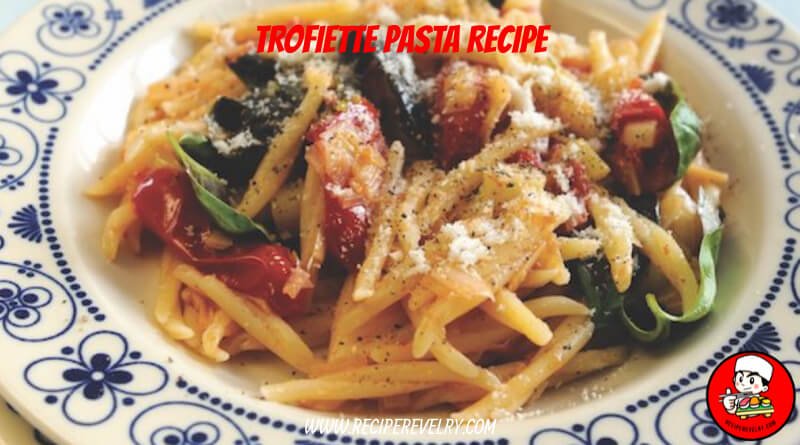
Let me take you on a culinary adventure with trofiette pasta! Hailing from the picturesque region of Liguria, Italy, trofiette pasta is a true gem in the world of Italian cuisine. Its name derived from “strofissià,” meaning to rub, perfectly captures its unique shape—a delightful twisty pasta, crafted to capture every ounce of flavor in its nooks and crannies. With a texture that’s firm yet tender, trofiette pasta dances on your palate, making every bite a delightful experience. Join me as we explore the origins and intricacies of this beloved Italian pasta!
Ingredients for Trofiette Pasta
- Trofiette pasta
- Olive oil
- Garlic
- Cherry tomatoes
- Fresh basil
- Salt and pepper
- Grated Parmesan cheese (optional)
1. Trofiette Pasta: This unique pasta variety is the star of the show, with its twisted shape and firm texture, perfect for capturing the flavours of the Sauce.
2. Olive Oil: A staple in Italian cuisine, olive oil adds richness and depth to the dish, enhancing the overall flavour profile.
3. Garlic: Fresh garlic cloves bring a spicy and aromatic element to the recipe, infusing the dish with savoury goodness.
4. Cherry Tomatoes: These vibrant and sweet tomatoes provide freshness and colour to the pasta dish, complementing the other ingredients perfectly.
5. Fresh Basil: Fragrant basil leaves add a touch of herbaceousness to the dish, elevating its taste and aroma.
6. Salt and Pepper: Essential for seasoning, Salt and pepper allow you to adjust the dish’s flavour to your liking, enhancing its overall taste.
7. Grated Parmesan Cheese (optional): For those who enjoy a cheesy finish, grated Parmesan cheese can be sprinkled on the pasta, adding a creamy and salty element to each bite.
Preparation of Trofiette Pasta
When preparing rosette pasta, mastering the cooking process is critical to achieving the perfect texture and flavour. Here’s how to prepare roulette pasta step by step:
1. Boiling Water in a Large Pot: Start by filling a large pot with water and bringing it to a rolling boil over high heat. A large pot ensures the pasta has enough room to cook evenly without sticking together.
2. Adding Salt to the Boiling Water: Add a generous amount once the water reaches a boil. This not only seasons the pasta but also helps enhance its flavour as it cooks. The water should taste like seawater, as they say in Italian cooking.
3. Cooking Trofiette Pasta until Al Dente: Carefully add the trofiette pasta to the boiling water, stirring gently to prevent clumping. Cook the pasta according to the package instructions or until it reaches al dente, meaning it’s firm to the bite but not too soft.
4. Reserving Pasta Water Before Draining: Reserve a cup of starchy pasta water before draining the cooked pasta. This water is rich in starch and can be used to adjust the consistency of the Sauce later on. Scoop some water using a spoon or measuring cup and set it aside.
Making the Sauce
Now, let’s dive into creating the delectable Sauce that will accompany our rosette pasta:
1. Heating Olive Oil in a Skillet Over Medium Heat: Begin by heating a drizzle of olive oil in a skillet over medium heat. Olive oil adds a rich and flavorful base to the Sauce, enhancing its overall taste.
2. Adding Minced Garlic to the Skillet and Sautéing Until Fragrant: Once the oil is hot, add minced garlic to the Skillet. Sauté the garlic until it becomes fragrant and golden brown, releasing its aromatic flavours into the oil.
3. Adding Halved Cherry Tomatoes to the Skillet: Add halved cherry tomatoes to the Skillet. These juicy tomatoes will give the Sauce a sweetness and freshness, complementing the savoury garlic.
4. Cooking Until Tomatoes are Slightly Softened: Allow the cherry tomatoes to cook in the Skillet until they are slightly softened. This process helps release their natural juices and intensifies their flavour, creating a delicious base for the pasta sauce. Stir occasionally to ensure even cooking.
Combining Pasta and Sauce
Now comes the exciting part: combining the cooked rosette pasta with the flavorful Sauce we’ve prepared:
1. Adding Cooked Trofiette Pasta to the Skillet with the Sauce: Carefully transfer the cooked rosette pasta from the pot to the Skillet containing the prepared Sauce. The pasta should still be hot to ensure it absorbs the flavours of the Sauce.
2. Tossing to Coat the Pasta Evenly with the Sauce: Using tongs or a pasta fork, gently toss the pasta in the Skillet to coat it evenly with the Sauce. This ensures that every strand of pasta is infused with the delicious Sauce flavours.
3. Adding Reserved Pasta Water if Needed for Consistency: If the Sauce seems too thick or prefers a saucier consistency, add some of the reserved pasta water to the Skillet. The starchy water will help loosen the Sauce and create a silky texture that clings to the pasta.
4. Seasoning with Salt and Pepper to Taste: Finally, taste the pasta and sauce mixture and season it with Salt and pepper to your liking. Adjust the seasoning as needed to enhance the flavours of the dish. Remember, a little seasoning can go a long way in elevating the taste of the pasta.
Garnishing and Serving
As we put the finishing touches on our rosette pasta, let’s garnish it and get ready to serve:
1. Tearing Fresh Basil Leaves and Sprinkling Over the Pasta: Take a few fresh basil leaves and tear them into small pieces using your hands. Sprinkle the torn basil leaves generously over the plated pasta. Basil adds freshness and aromatic flavour to the dish, enhancing its overall taste and presentation.
2. Optionally, Topping with Grated Parmesan Cheese: Top the rosette pasta with grated Parmesan cheese if desired. Parmesan cheese adds a creamy and slightly salty flavour that complements the other ingredients in the dish. It’s a delightful addition for cheese lovers but can be omitted for a dairy-free option.
3. Serving Hot: Once garnished, serve the rosette pasta immediately while it’s still hot and freshly prepared. Transfer the pasta to individual serving plates or bowls and enjoy it as a comforting and satisfying meal. Pair it with a side salad or crusty bread for a complete dining experience. Buon appetito!
Tips for Perfect Trofiette Pasta
To ensure your rosette pasta turns out perfectly every time, consider these helpful tips:
1. Use High-Quality Trofiette Pasta for the Best Results: Invest in good quality rosette pasta made from durum wheat semolina. Higher quality pasta cooks more evenly and holds its shape and texture better, resulting in a more satisfying dish.
2. Don’t Overcook the Pasta; It Should Be Al Dente: Cook the rosette pasta until it reaches al dente, which means it’s firm to the bite but not mushy. Overcooking can lead to a soggy and unappealing texture, so keep a close eye on the pasta while it cooks.
3. Reserve Some Pasta Water to Adjust the Sauce Consistency: Before draining the cooked pasta, scoop out some of the starchy pasta water and set it aside. This water can be used to adjust the consistency of the Sauce later on, ensuring it’s just right.
4. Adjust Seasoning According to Taste Preference: Taste the pasta and sauce mixture before serving and adjust the seasoning as needed. Add more Salt and pepper to enhance the flavours, or incorporate other herbs and spices to suit your taste preferences.
5. Fresh Ingredients Like Basil and Cherry Tomatoes Enhance the Flavor: Use fresh basil leaves and ripe cherry tomatoes in your pasta dish whenever possible. These fresh ingredients add brightness, depth, and complexity to the flavours, elevating the dish’s overall taste.
Variations and Additional Ideas
Ready to elevate your rosette pasta game? Here are some creative variations and additional ideas to try:
1. Adding Cooked Shrimp or Chicken for Protein: Amp up the protein content of your pasta dish by adding cooked shrimp or chicken. Sauté the protein of your choice separately and toss it with the pasta and Sauce before serving. The added protein makes the dish more satisfying and nutritious.
2. Incorporating Other Vegetables like Spinach or Bell Peppers: Enhance your rosette pasta’s nutritional value and flavour profile by incorporating additional vegetables like spinach or bell peppers. Sauté the vegetables until tender and mix them into the pasta for a pop of colour and texture.
3. Trying Different Herbs like Parsley or Oregano for Flavor Variation: Experiment with different herbs to give your pasta dish a unique flavour twist. Try using parsley, oregano, thyme, or rosemary to infuse the dish with fresh, aromatic notes.
4. Experimenting with Different Types of Cheese for Topping: Get creative with your cheese selection by trying different types of cheese for topping. The options are endless, from tangy goat cheese to sharp cheddar or creamy gorgonzola. Sprinkle your cheese on the pasta before serving for a decadent finishing touch.
5. Making a Creamy Sauce by Adding a Splash of Heavy Cream: For a luxurious twist, make a creamy sauce by adding a splash of heavy cream to the Skillet and other ingredients. The cream adds richness and velvety texture to the Sauce, transforming your rosette pasta into a decadent indulgence.
Storage and Reheating
When it comes to storing and reheating your delicious rosette pasta leftovers, follow these simple steps:
1. Storing Leftovers in an Airtight Container in the Refrigerator for up to 3 Days: To preserve the freshness and flavour of your rosette pasta, transfer any leftovers to an airtight container and store them in the Refrigerator. Make sure the pasta is cooled entirely before refrigerating to prevent bacterial growth. Stored properly, rosette pasta can last up to three days in the fridge.
2. Reheating in a Skillet Over Low Heat with a Splash of Water to Prevent Drying Out: When ready to enjoy your leftover rosette pasta, reheat it gently in a skillet over low heat. Adding a splash of water to the Skillet helps prevent the pasta from drying out and maintains moisture. Stir the pasta occasionally as it heats up to ensure even reheating. Once heated through, your rosette pasta will be ready to serve and enjoy all over again.
FAQ
Can I use other types of pasta for this recipe instead of rosette?
Yes, you can use any pasta shape you prefer, but rosette works best for this particular recipe due to its unique texture.
How can I make this recipe vegetarian-friendly?
Omit any meat or seafood additions and focus on using fresh vegetables and herbs for flavour.
Can I make the Sauce in advance and store it?
Yes, you can prepare the Sauce ahead of time and store it in an airtight container in the Refrigerator for up to 2 days.
Can I freeze the cooked rosette pasta for later use?
While possible, pasta tends to lose its texture when frozen and thawed, so it’s best enjoyed fresh.
What can I serve with rosette pasta to complete a meal?
A simple side salad and some crusty bread make excellent accompaniments to complement the flavours of the pasta dish.
Conclusion and Call to Action
As we wrap up our journey through the world of rosette pasta, let’s take a moment to reflect on its simplicity and deliciousness:
1. Recap the Simplicity and Deliciousness of Trofiette Pasta Recipe: Trofiette pasta, with its unique shape and texture, offers a delightful culinary experience that is both simple to prepare and incredibly flavorful. From the tender pasta twirls to the vibrant Sauce bursting with fresh ingredients, every bite is a symphony of taste and texture.
2. Encourage Readers to Try Making the Recipe at Home: If you haven’t already, I encourage you to try this rosette pasta recipe in your kitchen. Whether you’re cooking for yourself, your family, or friends, it’s sure to be a hit. Don’t be intimidated by making pasta from scratch – with simple ingredients and easy-to-follow instructions, you’ll be amazed at what you can create.
3. Invite Them to Share Their Experiences or Variations in the Comments Section: Have you tried making rosette pasta before? Or are you inspired to give it a go after reading this article? Either way, I’d love to hear from you! Feel free to share your experiences, tips, or variations of the recipe in the comments section below. Let’s continue the conversation and celebrate the joy of cooking together.