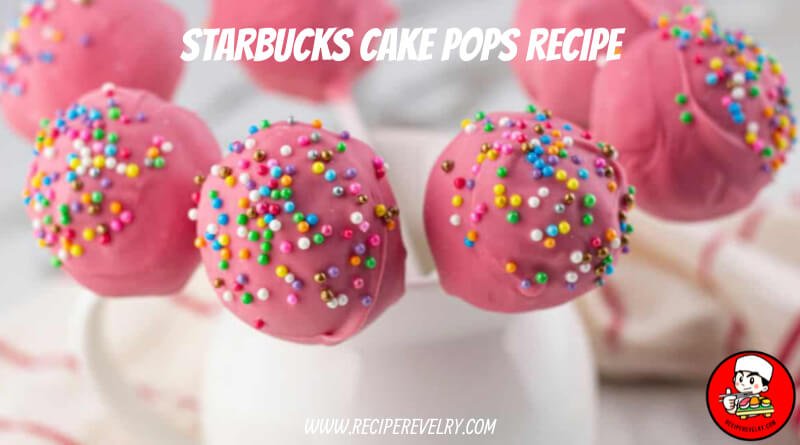
Recipe for Cake Pops Starbucks: Indulging in the delightful world of Starbucks Cake Pops is not just about enjoying a sweet treat; it’s a journey into sheer joy and decadence. These miniature confections have captivated taste buds worldwide with their irresistible charm. As an avid baker and lover of all things sweet, delving into the realm of recreating these Starbucks sensations in my kitchen has been rewarding. Join me as I unveil the secrets behind crafting these delectable delights, and let’s embark on a culinary escapade together!
Ingredients For Starbucks Cake pops Recipe
- Cake Mix
- Frosting
- Lollipop Sticks
- Melting Chocolate
- Sprinkles (optional)
The right ingredients are vital when crafting delicious Starbucks Cake Pops in your kitchen. Here’s a rundown of what you’ll need:
1. Cake Mix: Start with your favorite cake mix flavor. Whether it’s classic vanilla, rich Chocolate, or something more adventurous like red velvet, choose a flavor that speaks to your taste buds.
2. Frosting: This acts as the binding agent for your cake pops, adding moisture and flavor. Opt for a frosting that complements your chosen cake flavor, whether it’s creamy vanilla, decadent Chocolate, or tangy cream cheese.
3. Lollipop Sticks: These are essential for turning your cake balls into portable, handheld treats. Make sure to have enough on hand for all your cake pops.
4. Melting Chocolate: Use high-quality melting chocolate to coat your cake pops. Whether you prefer milk, dark, or white Chocolate, ensure it’s suitable for melting and dipping.
5. Sprinkles (optional): Consider adding sprinkles to your cake pops for a fun and decorative touch. Choose from various colors and shapes to match the occasion or your preference.
Equipment Needed
- Mixing Bowls
- Baking Pan
- Parchment Paper
- Microwave or Double Boiler
- Styrofoam Block (for holding cake pops while drying)
A. Mixing Bowls
Mixing bowls is essential for combining your cake mix and frosting to create the perfect consistency for forming your cake pops. Choose sturdy and large bowls to accommodate the volume of ingredients you’ll be working with.
B. Baking Pan
A baking pan is necessary for baking your cake according to the instructions on the cake mix package. Make sure to use the appropriate size pan and grease it well to prevent sticking.
C. Parchment Paper
Parchment paper lines your baking pan, ensuring your cake doesn’t stick to the bottom. It also makes for easy cleanup and prevents your cake pops from becoming misshapen when removing them from the pan.
D. Microwave or Double Boiler
You’ll need a microwave or a double boiler to melt your Chocolate and coat the cake pops. If using a microwave, melt the Chocolate in short intervals and stir frequently to prevent burning. A double boiler offers more control over the melting process and reduces the risk of overheating the Chocolate.
E. Styrofoam Block (for holding cake pops while drying)
Once you’ve dipped your cake pops in Chocolate, you’ll need a styrofoam block to hold them upright while they dry. This ensures that the chocolate coating remains smooth and evenly distributed. Insert the lollipop sticks into the styrofoam block and allow the cake pops to set until the Chocolate hardens.
Cake Preparation
Baking the Cake
1. Follow Cake Mix Instructions:
To achieve a moist and flavorful cake, it’s crucial to adhere closely to the instructions on the cake mix box. This usually entails blending the cake mix with eggs, oil, and water. Utilize a mixing bowl and either an electric mixer or a whisk to combine these ingredients thoroughly until the batter achieves a smooth consistency.
2. Allow Cooling Time:
Once the cake is baked, remove it from the oven and allow it to cool completely inside the baking pan. Cooling allows the cake to be appropriately set and more accessible when crumbing and forming into cake pops. It also prevents the frosting from melting when mixed with the crumbled cake.
Crumbling the Cake
1. Crumble the Cooled Cake:
Once the cake has cooled, use your hands or a fork to crumble it into fine crumbs. Break the cake apart until no large chunks remain. This step prepares the cake for mixing with frosting and shaping into cake pops.
2. Add Frosting for Binding:
Add frosting to the crumbled cake crumbs, a little at a time, until the mixture holds together when pressed. The frosting acts as a binder, helping the cake pops maintain their shape. Be careful not to add too much frosting, as it can make the mixture too wet and difficult to work with.
Forming Cake Pops
Shaping the Mixture
1. Scoop and Roll into Balls:
Portion the cake mixture with a small cookie scoop or spoon and roll it between your palms to form smooth, compact balls. Ensure each ball is uniform in size for consistent cake pops.
2. Insert Lollipop Sticks:
Once all the cake balls are formed, gently insert a lollipop stick into the center of each ball, pushing it about halfway through. Be careful not to make it too hard to avoid cracking the cake balls. The posts will act as handles for the cake pops.
Refrigeration
1. Chill Cake Pops for Firmness:
After forming the cake pops, place them on a baking sheet lined with parchment paper. Transfer the baking sheet to the refrigerator and allow the cake pops to chill for 15-30 minutes. This step is crucial as it helps the cake pops firm up, ensuring they maintain their shape when dipped in chocolate. Additionally, chilling them reduces the risk of falling apart during the dipping process.
2. Ensuring Proper Set:
After dipping the cake pops in Chocolate, please return them to the refrigerator to set them completely. This usually takes about 10-15 minutes. Once set, the chocolate coating will be firm and shiny, ready to enjoy or decorate. Refrigeration also helps prevent the Chocolate from melting too quickly when handling the cake pops.
Chocolate Coating
Melting Chocolate
1. Microwave Method:
Break the chocolate into small, even pieces and place them in a microwave-safe bowl. Microwave the chocolate in 30-second intervals, pausing to stir between each interval until it’s melted and smooth. Take care not to overheat the chocolate, as it can burn easily.
2. Double Boiler Method:
Fill the bottom of a double boiler with water and heat it until it gently simmers. Place the chocolate in the top bowl of the double boiler and stir occasionally. Continue heating the chocolate until it is completely melted and smooth. The gentle heat from the steam indirectly softens the chocolate, preventing it from burning.
Dipping Cake Pops
1. Submerging the Cake Pops:
Hold the cake pop by the stick and immerse it into the melted chocolate, swirling gently to coat it evenly. Use a spoon or spatula to assist in covering the entire cake pop if necessary. Remove the cake pop from the chocolate, allowing any extra chocolate to drip off before moving forward.
2. Letting Excess Chocolate Drip Off:
Hold the cake pop over the bowl of melted chocolate for a few seconds to let any excess chocolate drip off. Lightly tap the stick against the side of the bowl to assist in removing any extra chocolate. This process ensures a uniform and smooth coating of chocolate on the cake pops.
Decorating
Adding Sprinkles
1. Sprinkle Variety:
Choose from various sprinkle options to add color, texture, and flavor to your cake pops. Options include traditional rainbow sprinkles, chocolate sprinkles, metallic dragees, or themed sprinkles for special occasions like birthdays or holidays.
2. Customize According to Preference:
Customize the decoration of your cake pops according to your personal preference or the theme of your event. You can mix and match different sprinkle colors and shapes to create unique, eye-catching designs that reflect your style.
Setting Decorations
1. Decorate Before Chocolate Hardens:
Add sprinkles or other decorations to your cake pops while the chocolate coating is still wet. This allows the ornaments to adhere to the chocolate surface and become securely embedded before it hardens. Work quickly to decorate each cake pop before the chocolate sets.
2. Allow Final Set:
After decorating your cake pops, ensure they set completely before serving or packaging. Place the cake pops upright in a styrofoam block or on a baking sheet lined with parchment paper. Allow them to rest at room temperature or in the refrigerator until the chocolate coating has fully hardened. This ensures the decorations remain intact, and your cake pops are ready to be enjoyed.
Tips for Perfect Cake Pops
Mastering the art of making cake pops requires attention to detail and a few fundamental techniques. Here are some essential tips to ensure your cake pops turn out perfectly every time:
Proper Cake Consistency
Achieving the right consistency for your cake mixture is crucial for forming cake pops that hold their shape and have the perfect texture. Ensure your cake crumbs are finely crumbled and evenly mixed with the frosting. The mixture should be moist enough to hold together when rolled into balls but not too wet or sticky.
Ideal Chocolate Temperature
Maintaining the ideal temperature of the chocolate is crucial for achieving perfectly smooth and glossy cake pops. Overheating the chocolate can result in it becoming thick and challenging to handle. Aim for a temperature range of approximately 88°F to 90°F (31°C to 32°C) when melting chocolate for dipping your cake pops. If the chocolate starts to thicken while dipping, gently reheat it until it returns to the desired consistency.
Patience in Decorating
Decorating cake pops requires patience and attention to detail. Take your time when adding sprinkles or other decorations to ensure each cake pop looks its best. Work quickly while the chocolate coating is wet, but take your time. Allow each decoration layer to set before adding the next to prevent smudging or melting. With patience and practice, you’ll create beautifully decorated cake pops that are as visually appealing as delicious.
Additional Ideas
Enhance your cake pop experience with these creative ideas to add variety and flair to your treats:
Flavor Variations
Get creative and explore various cake flavors and frosting combinations to craft unique cake pops. From traditional favorites like chocolate and vanilla to daring choices such as lemon, red velvet, or confetti, the options are limitless. Experiment with mix-ins like nuts, chocolate chips, or fruit to enhance texture and flavor complexity in your cake pops. Let your imagination run wild as you discover new and exciting flavor combinations to delight your taste buds.
Seasonal or Themed Decorations
Tailor your cake pops to suit the season or a specific theme by decorating them with festive or themed decorations. For example, decorate cake pops with pastel-colored sprinkles and edible flowers for a springtime celebration, or use themed sprinkles and fondant decorations to match a holiday or special occasion. Get creative with colors, shapes, and designs to make your cake pops stand out and delight your guests.
Gift Packaging Suggestions
Transform your cake pops into thoughtful gifts by packaging them in creative and appealing ways. Consider placing individual cake pops in clear cellophane bags tied with colorful ribbons for a simple yet elegant presentation. Alternatively, arrange several cake pops in a decorative box or tin lined with tissue paper for a more sophisticated gift presentation. Add personalized tags or labels to each package to make them extra special for the recipient. With beautiful packaging, your cake pops will make a memorable impression as gifts for birthdays, weddings, showers, or any other occasion.
FAQ
Can I use any cake mix for making Starbucks-style cake pops?
Yes, you can use any flavor of cake mix to create Starbucks-inspired cake pops.
How long do I need to chill the cake pops before dipping them in Chocolate?
Chill the cake pops in the refrigerator for 15-30 minutes until they are firm to the touch.
Can I use homemade frosting to bind the cake crumbs?
Homemade frosting works well for binding the cake crumbs; ensure it’s thick enough to hold the mixture together.
Do I need lollipop sticks, or can I use something else?
Lollipop sticks are recommended for creating the classic cake pop shape, but you can also use wooden skewers or decorative paper straws.
How long do cake pops stay fresh after they’ve been made?
When kept in an airtight container in the refrigerator, cake pops can retain their freshness for approximately 3 to 4 days.
Conclusion
Mastering the art of crafting delectable cake pops inspired by Starbucks involves attention to detail and a dash of creativity. Anyone can create irresistible treats by following the recipe for cake pops Starbucks and utilizing essential techniques such as proper cake consistency, ideal chocolate temperature, and patience in decorating. Experimenting with flavor variations, seasonal decorations, and personalized packaging adds excitement and charm to the cake pop-making process. Encouraging social media sharing, requesting feedback from followers, and suggesting trying different Starbucks cake pop flavors foster community engagement and culinary exploration. With these tips and FAQs in mind, you’re well-equipped to embark on a delightful journey of cake pop creation.
Call to Action
Inspire and engage with your audience by encouraging them to take Action and share their cake pop experiences:
Encourage Sharing on Social Media
Invite your readers to showcase their homemade cake pops on social media platforms like Instagram, Facebook, or Twitter using a designated hashtag, such as #CakePopCreations or #HomemadeDelights. Please encourage them to share photos of their finished cake pops and any creative flavor variations or decorations they’ve tried. This creates a sense of community and allows others to admire and be inspired by their creations.
Request Feedback and Photos from Followers
I’d love to hear from you! Share your feedback and photos of your cake pops with me through comments, direct messages, or email. Whether you want to rave about how delicious they turned out, share any challenges you faced, or offer tips and tricks you discovered along the way, I’m all ears. Your input helps me improve my recipes and creates a sense of community among us. So don’t hesitate to reach out and let’s keep the conversation going!
Suggest Trying Different Starbucks Cake Pop Flavors
Inspire your audience to expand their cake pop horizons by suggesting they try different Starbucks flavors beyond the classic options. Please encourage them to visit their local Starbucks and sample seasonal or limited-time flavors, such as pumpkin spice, peppermint mocha, or birthday cake. Please share your experiences with trying different tastes and invite your readers to share theirs. This promotes experimentation and adds excitement to the cake pop-making process.