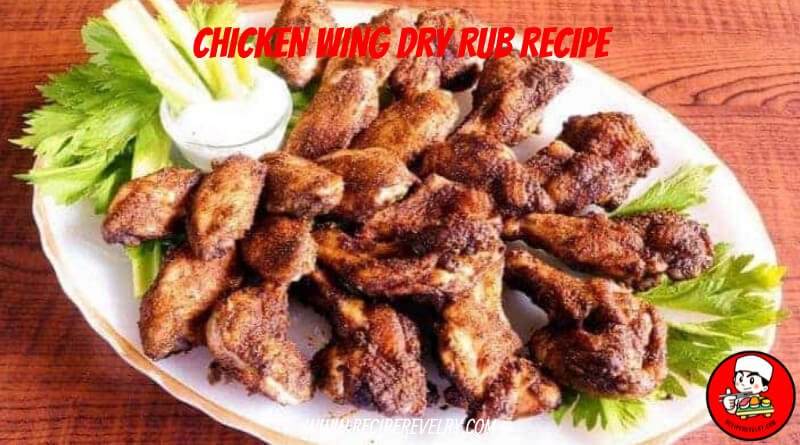
Hey there, wing enthusiasts! Today, let’s dive into the world of flavor-packed chicken wing dry rubs. As someone who appreciates the art of crafting the perfect wings, you already know that the secret to finger-licking goodness lies in the seasoning. Dry rubs are our ticket to elevating these humble chicken wings into culinary delights bursting with flavor. Come along with me on this flavorful adventure as we discover the magic of dry rubs and their ability to elevate simple chicken wings into extraordinary delights bursting with flavor!

Ingredients for the Chicken Wing Dry Rub.
- Spices
- Herbs
- Salt and Pepper
- Optional Ingredients
1. Spices: These are the flavor heroes of our dry rub. We’ll need paprika for its rich color and smoky taste, garlic powder to add depth, onion powder for a savory kick, and a hint of cayenne pepper for that gentle heat.
2. Herbs: Fresh or dried herbs bring a burst of freshness to our rub. Thyme lends a subtle earthiness, while oregano adds a Mediterranean flair, enhancing the overall aroma and taste.
3. Salt and Pepper: The unsung heroes that balance the flavors and elevate the taste. A dash of salt elevates the other flavors, while the sharpness of freshly ground black pepper delivers a lively punch.
4. Optional Ingredients: Here’s your chance to unleash your creativity! Add a sprinkle of brown sugar to infuse a subtle sweetness and achieve a delightful caramelization, or crank up the heat by incorporating chili powder for an extra fiery kick. These optional ingredients add depth and complexity to our dry rub, allowing you to tailor the flavor to your liking.
Preparation Steps
1. Mixing the Dry Rub Ingredients: Start by gathering all the spices, herbs, salt, and pepper in a bowl. Use a spoon or whisk to combine them thoroughly until evenly distributed. Make sure there are no clumps, ensuring each wing gets a balanced coating of flavor.
2. Adjusting Spice Levels: Taste-test a small amount of the dry rub mixture to gauge the spice levels. For a gentler taste, lessen the quantity of cayenne pepper or leave it out altogether. Conversely, if you’re a heat seeker, feel free to add more cayenne pepper or other spicy ingredients to amp up the kick. Remember, it’s all about tailoring the dry rub to your taste preferences, so don’t be afraid to experiment until you find the perfect balance of flavors.
Preparation of Chicken Wing
1. Selecting and Preparing Chicken Wings: Begin by choosing high-quality chicken wings from your local butcher or grocery store. Look for wings that are plump and have smooth, unblemished skin. Once you have your wings, it’s time to prep them for seasoning. Using a sharp knife, trim any extra fat or loose skin from the chicken wings. This step promotes even cooking and minimizes flare-ups on the grill or in the oven. Next, gently pat the wings dry with paper towels to eliminate any excess moisture. This ensures a crispy exterior as they cook.
2. Marinating Wings (Optional): While not necessary, marinating the chicken wings before applying the dry rub can enhance their flavor and tenderness. For a speedy yet flavorful marinade, blend olive oil, lemon juice, minced garlic, and your preferred herbs. Submerge the chicken wings in a resealable plastic bag or shallow dish, pouring the marinade over them. Let them chill in the fridge for a minimum of 30 minutes, allowing the marinade to seep into the meat, enriching it with delightful flavors. If you’re pressed for time, feel free to skip this step and proceed directly to seasoning the wings with the dry rub for equally delectable results.
Application of the Dry Rub
1. Evenly Coating the Chicken Wings: Begin by laying out the prepped chicken wings on a clean, dry surface, such as a cutting board or baking sheet. Sprinkle a generous amount of the dry rub mixture over the wings, making sure to coat each wing thoroughly on all sides. Use your hands to gently rub the seasoning into the meat, pressing it firmly to adhere.
2. Ensuring Full Coverage and Flavor Absorption: To ensure every inch of the wings is infused with flavor, pay close attention to areas that may have been missed, such as crevices between the wing joints. Use your fingertips to massage the dry rub into these spots, ensuring no surface is left untouched. Let the seasoned wings sit for a few minutes to allow the flavors to seep into the meat before you start cooking them.
Resting Period.
1. Importance of Allowing the Dry Rub to Adhere: After applying the dry rub to our chicken wings, it’s essential to give them some time to rest. This resting period allows the flavors of the dry rub to meld with the meat, creating a harmonious blend of seasonings that will permeate every bite. Additionally, resting the wings helps the dry rub adhere more firmly to the surface of the meat, ensuring that it doesn’t easily rub off during cooking.
2. Ideal Duration for Resting: The ideal duration for the resting period typically ranges from 30 minutes to 1 hour. During this time, the seasoned wings can be left uncovered in the refrigerator, allowing the flavors to develop and intensify. However, if you’re short on time, even a brief resting period of 15-20 minutes can still yield flavorful results. Be sure to complete this step because it plays a crucial role in maximizing the flavor of our chicken wings.
Cooking Methods
1. Various Cooking Methods: There are several methods you can choose from to cook your chicken wings to perfection, each offering its own unique advantages. Grilling is perfect for those who love smoky flavors and crispy skin while baking yields tender wings with less added fat. Frying results in irresistibly crispy wings, though it requires more oil and attention. Select the method that aligns with your taste preferences and the cooking equipment you have available.
2. Recommended Cooking Times and Temperatures:
- For grilling: Preheat your grill to medium-high heat, typically between 375°F to 400°F. Grill the chicken wings for about 20 to 25 minutes, remembering to flip them halfway through the cooking process. Ensure they’re cooked through by checking that they reach an internal temperature of 165°F.
- For baking: Preheat the oven to 400°F. Line a baking sheet with parchment paper or aluminum foil, then arrange the chicken wings evenly on it. Bake for 40-45 minutes, remembering to flip them halfway through the cooking time. Keep baking until the wings are golden brown and crispy, ensuring their internal temperature reaches 165°F.
- For frying: Heat oil in a deep fryer or large pot to 375°F. Add the chicken wings to the hot oil in batches, making sure not to overcrowd the fryer. Fry them for 8-10 minutes until they turn a beautiful golden brown and become crispy on the outside. Ensure they reach an internal temperature of 165°F to guarantee they’re cooked through and safe to eat.
Tips for Perfectly Seasoned Wings.
1. Achieving the Desired Level of Crispiness and Flavor Intensity: To achieve the perfect balance of crispiness and flavor intensity, it’s essential to pay attention to cooking times and temperatures. For crispy wings, ensure your oven or grill is preheated to the recommended temperature, and avoid overcrowding the cooking surface, which can result in steaming instead of crisping. Additionally, adjust the amount of dry rub used according to your taste preferences – more seasoning for a bolder flavor, less for a milder taste.
2. Avoiding Common Pitfalls: To avoid common pitfalls such as over-seasoning or undercooking, it’s crucial to taste-test the dry rub mixture before applying it to the wings. Begin with a modest portion of seasoning, then incrementally increase it until you achieve the flavor intensity you desire. Remember, you can always add more seasoning during cooking if needed, but you can’t take it away once it’s been added. Additionally, it’s essential to utilize a meat thermometer to guarantee that the chicken wings are cooked thoroughly, reaching an internal temperature of 165°F. This step is crucial for food safety, as it helps to avoid undercooking and the potential risk of foodborne illness.
Serving Suggestions
1. Ideas for Serving Chicken Wing: Get creative with your chicken wing spread by offering a variety of dipping sauces to complement the flavors. Classic choices like ranch and blue cheese are always crowd-pleasers. At the same time, homemade barbecue sauce or spicy sriracha mayo can add a tasty twist. Serve the wings alongside crisp celery sticks and carrot slices for a refreshing crunch that balances the richness of the wings.
2. Presentation Tips for an Appetizing Display: When it comes to presenting your chicken wings, opt for a rustic-chic approach by arranging them on a large platter lined with fresh lettuce or cabbage leaves. Garnish with chopped herbs like parsley or cilantro for a pop of color and freshness. To elevate the presentation further, consider serving the wings in individual baskets or on wooden boards, accompanied by small ramekins of dipping sauce for easy sharing.
Additional Ideas
1. Creative Variations of the Dry Rub Recipe: Get creative by exploring a variety of spices and flavorings to craft distinctive variations of your dry rub. Consider introducing smoked paprika for a luxurious, smoky essence that complements both grilled and baked wings splendidly. Additionally, experiment with ingredients such as chipotle powder, mustard powder, or even cocoa powder for surprising flavor amalgamations that will excite your palate with each bite.
2. Suggestions for Customizing the Recipe: Tailor the dry rub recipe to suit your individual taste preferences by adjusting the spice levels and experimenting with different herbs and seasonings. For a bolder spice, amp up the heat by adding more cayenne pepper or tossing in some crushed red pepper flakes. These fiery additions will give your chicken wings an extra kick that’s sure to excite your taste buds. For a milder flavor profile, reduce the amount of spicy ingredients and focus on aromatic herbs like rosemary or basil. Don’t be afraid to get creative and customize the recipe to create your own signature blend of flavors!
FAQ
Can I use the dry rub on other types of meat besides chicken wings?
Yes, you can use the dry rub on various types of meat like chicken thighs, drumsticks, or even pork ribs for deliciously seasoned results.
How long can I store the dry rub for future use?
You can keep the dry rub fresh by storing it in an airtight container in a cool, dry place for up to six months.
Can I adjust the spice levels of the dry rub to suit my taste preferences?
Absolutely! Feel free to adjust the amount of spices and seasonings in the dry rub recipe to achieve your desired level of heat and flavor.
Can I make a large batch of dry rub and freeze it for later use?
Yes, you can portion the dry rub into freezer-safe bags or containers and freeze them for up to 1 year. Just thaw before using.
Can I use fresh herbs instead of dried in the dry rub recipe?
While dried herbs are typically preferred for dry rubs due to their concentrated flavor, you can use fresh herbs if desired, but keep in mind that they may have a milder taste.
Conclusion and Call to Action
1. Encourage Readers to Try Out the Chicken Wing Dry Rub Recipe: I encourage you to roll up your sleeves, gather your ingredients, and give this chicken wing dry rub recipe a try! Whether you’re a seasoned chef or a novice in the kitchen, I’m confident that you’ll be delighted by the bold flavors and irresistible crunch of these wings. Don’t forget to share your feedback and photos of your culinary creations – I’d love to hear how they turned out!
2. Invite Them to Explore Other Recipes and Cooking Tips: If you enjoyed this chicken wing recipe, why not explore some of the other delicious recipes and cooking tips available on our website or social media channels? Explore a world of culinary delights with us, from savory appetizers to mouthwatering main courses and decadent desserts. Join our vibrant community of food enthusiasts as we embark on an exciting culinary journey together. Share your inspiration, swap tips, and learn new tricks along the way. Let’s savor every moment and create unforgettable dining experiences together!


